The Solutions Engineering team at Fullstory builds proofs of concept to demonstrate how Fullstory enhances myriad tools in the software development landscape. One category of tools Fullstory compliments particularly well are Application Performance Monitoring (APM) and Error Tracking platforms. Fullstory’s embedded session replay URLs erase the gap between the experiences of the software engineers supporting an application and users who are having issues with that application. New Relic is one of our APM partners and we’ve built a proof of concept demonstrating how Fullstory session replay URLs can be integrated into New Relic traces. If you’d like to know more about Fullstory + New Relic, hit this link and dive in.
In this article, we’re going to look at how we used the AWS CDK to build the simple API at the core of our New Relic proof of concept. In a subsequent article, we’ll review how we further improved our code organization using Lerna for package management and Webpack for bundling and minification.
Read on if you’d like to learn more about how you can rapidly build an API in AWS that can scale from proof of concept to production.
AWS CDK: The Basics
The AWS CDK is an infrastructure as code framework that lets software engineers use TypeScript to create CloudFormation templates that define the runtime infrastructure of their AWS applications.
Assuming you have node.js installed on your laptop, get started with the CDK by running npx cdk init --language typescript in an empty directory.
The following files and directories will be created:
jest.config.js configures the testing directory for the project and applies the ts-jest transform to run tests on TypeScript files
cdk.json defines the cdk toolkit command that executes Stack creation A Stack is a unit of deployment in the AWS CDK where all AWS resources defined within the scope of a stack are provisioned together. This file also includes cdk feature flags that influence the behavior of the cdk toolkit command line tool; see the for a definition of what these flags do.
A
bindirectory that contains the entry point for the cdk toolkit command that executes stack creation.A
libdirectory that contains all of the code that builds a stackA
testdirectory that contains test assertions for the generated CloudFormation templates and CDK Constructs. Constructs are the fundamental building blocks of an AWS CDK app; they represent individual components like DynamoDB tables, S3 buckets, etc. The output of thecdk initcommand includes the Jest testing framework and a single test. More details about testing CDK Constructs can be found here.
Run npx cdk synth (see doc) to verify that your stack is defined correctly. You haven’t changed anything from the boilerplate stack definition yet, so an empty CloudFormation template will be generated and output to stdout.
Since the synth command worked as expected, let’s run a deploy command. You’ll need access to an AWS account with permissions to create resources in that account (e.g. Admin access). You can follow the steps for configuring the AWS CLI with your access credentials to ensure that the CDK CLI can create the resources you define for your stack.
Run npx cdk deploy:
Running npx cdk deploy from the project root
We haven’t actually defined any Constructs for our stack yet, so the only resource created in your AWS account is stack metadata.
Nothing to see here!
Let’s move on to bigger things...
Building the Reactshoppe API Stack
In order to demo NewRelic features, we’ve built a React/Redux web app called Reactshoppe. It’s a very simple fake ecommerce site, which demands a very simple fake ecommerce API to support it.
The Reactshoppe API looks like this:
An API Architecture
This is a classic AWS managed-services architecture: API Gateway provides the frontend, AWS Lambda performs the application logic, and DynamoDB stores the results.
We’ll use the AWS CDK to put it all together.
Start with the database
Let’s start defining our infrastructure by creating the Construct for our DynamoDB database.
We’re going to create a single “Order” table that has a partition key named “id.”
A few things to point out about this Construct:
The removal policy is set to DESTROY which means that the Order table will be deleted when we run the
npx cdk destroycommand. The default policy is RETAIN for DynamoDB tables for good reason! If I were building a real app, I wouldn’t want to tear down my Order table and delete all my order data so easily :PWe’ve used the smallest possible read and write capacity settings along with a “Provisioned” billing mode to ensure minimal charges for the purpose of hosting a sample application.
The
allowCrudfunction will be used to grant Order table access to the Lambda functions that make up our API. More information about how the AWS CDK manages grants and permissions can be found here.
Now we need to wire our database Construct into our Stack definition so that it can render the appropriate CloudFormation resources to create our Order table.
That’s it! Creating an instance of the database Construct class in your Stack class ensures that your DynamoDB table gets launched into your account. Verify the Stack by running npm run build and npx cdk synth. Once done, deploy the Order table with npx cdk deploy. You can view all of the changes required to build the Order table in this commit.
The only table I'll ever need
Build the Services
Now it’s time to do things. We’re going to build two API endpoints:
GET /pingwill simply return an HTTP 200 status and an “all good” JSON messagePOST /checkoutwill take a JSON payload for an ecommerce order, add an order id, and store the order in the Order table
To get started, we’re going to create a few components:
An "entrypoint" AWS Lambda function that handles all API requests and maps the proper API endpoint to the Lambda function that implements the business logic for that endpoint
The “ping” Lambda function
The “checkout” Lambda function
An AWS API Gateway integration for our Lambda functions
Let's start by looking at our updated stack definition:
We’ve added a reactshopp-api Construct and granted read/write access to our database from the api handler. The reactshoppe-api Construct sets up a Lambda proxy integration with AWS API Gateway:
A note about CORS: we’ve added configuration to the LambdaRestAPI instance to support an OPTIONS preflight request from the browser. We’re also returning CORS response headers directly from the Lambda functions that handle requests. If either one of these steps are missing, API requests from a browser will fail. In this example, I’m using a response helper to add the necessary CORS response headers to the responses returned from our Lambda functions.
OK, having said that, the entrypoint handler is...
We’re going to skip looking at the ping function and focus on the checkout function:
Notice the external dependencies on the uuid, etc. packages. Since we’ve got these dependencies, we’ll need to include a node_modules directory in the Lambda deployment package that contains these node packages. Thus, we need to run npm init in the lib/functions directory that contains all of our AWS Lambda code to add any external dependencies. Foreshadowing: we’re going to revisit this step when incorporating Lerna into our project in the second article in this series.
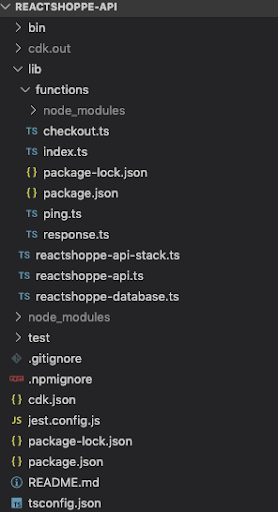
OK! After all the work, our project directory looks like this:
Some TypeScript files that we wrote, etc.
Now we can npm run build, npx cdk synth, and npx cdk deploy to build, verify, and deploy our changes. We should be good to go!
Except…
A bug! I thought we were done!!
I get an error when I POST /checkout. During runtime, my checkout function wants the TableNames enum from the reactshoppe-database module but it wasn’t included in the Lambda deployment package. Bummer, and now that I look at my file structure, I can see how having all of my Constructs piled into a single lib directory might get super messy over time if I were building a real application that had many Constructs.
A Cliffhanger...
We’ve come so far! We’ve defined our AWS CDK Stack and Constructs, we’ve deployed our API with ease, and we’re live... yet broken. We just need to get our missing reactshoppe-database module into our Lambda function runtime environment. How can we fix this bug? While we’re at it, how can we provide better code organization for our API source?
In part 2 of this series, we’ll dive into Lerna and showcase how a few commands enable us to achieve proper dependency management and improve maintainability (and fix our bug!). We’ll button up part 2 with a simple Webpack configuration that bundles and minifies our Lambda function code to optimize runtime performance.
Read Building APIs with the AWS CDK + Lerna + Webpack: Part 2 for the exciting conclusion :)


